

学习 React Native 13
添加一个背景图片
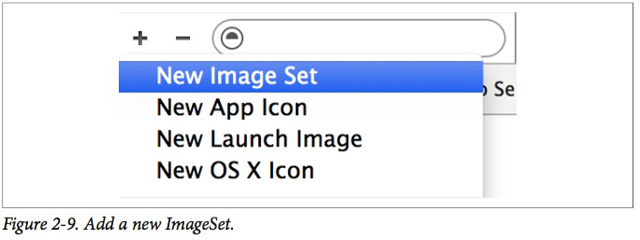
平白的背景色太枯燥了。让我们在展示的时候添加一个背景图片在我们的天气预报小应用中吧。诸如图片这样的资源文件是需要被添加到 Xcode 项目中的。选择 Images.xcassets 文件夹, 在这里添加一个新的图片资源。 接下来就可以通过拖拽的方式把图片加入到设置中。请确保图片设置中的图片名和图片文件名是匹配的,不然React Native 无法将该图片文件导入到应用中。
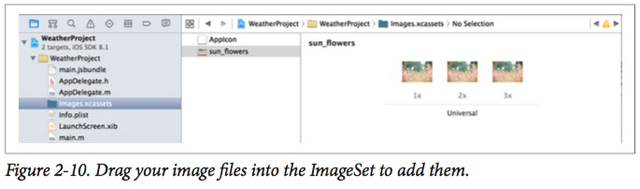
@2x 以及 @3x 这些不同的设置分别表示的是该图片基于基准分辨率所对应的两倍,以及三倍分辨率。因为天气预报 应用是针对全版本的设备进行设计的(这也意味着我们的应用是可以同时运行在iPhone 以及 iPad 之上),Xcode 能够让我们上传的图片有多种相对应的分辨率以适应不同的设备。
现在,图片已经导入了,让我们跳回原来的 React 代码。 加入一个背景图片。加背景图片并不能就象我们在网站开发那样的在 <div> 里直接添加背景属性。在这里我们可以直接用 <Image> 组件做为一个容器。
<Image source={require('image!flowers')}resizeMode='cover'style={styles.backdrop}> // Your content here</Image>
<Image>组件需要指定来源参数,我们通过使用 require 方法来实现。 调用 require (image!flowers)会让 React Native 在Xcode 的图片资源库里寻找一个文件名为 flowers 的图片资源。
千万别忘记使用 flexDirection 来样式化该组件,以便于他的子组件可以生成渲染如我们希望那样:
backdrop: {flex: 1,flexDirection: 'column'}
现在可以赋予<Image> 更多的子组件了:
<Image source={require('image!flowers')}resizeMode='cover'<View style={styles.overlay}>style={styles.backdrop}><Text style={styles.mainText}><View style={styles.row}> Current weather for </Text>style={[styles.zipCode, styles.mainText]} returnKeyType='go' onSubmitEditing={this._handleTextChange}/><View style={styles.zipContainer}> <TextInput </View> </View>main={this.state.forecast.main} description={this.state.forecast.description} temp={this.state.forecast.temp}/><Forecast </View></Image>
你可能已经注意到了,我在这里使用了一些我们还没有讨论过的额外的一些样式,比方说: row, overlay 以及 zipContainer 和 zipCode 样式。 你也可以翻到本章最后去查看完整的样式表。
从网站取回数据
接下来,让我们一起探索使用 React Native里所提供的网络 API。 你完全不需要通过使用Jquery 从移动设备上发送 AJAX请求!代替这种方式的是, React Native 完善了取回数据的 API. 使用取回数据的 API 非常直白简单:
fetch('http://www.somesite.com').then((response) => response.text()).then((responseText) => {});console.log(responseText);
我们将使用 OpenWeatherMap 的 API, 该 API 为我们提供了一个很简单的返回点,通过提供的邮政代码返回他所对应的地区的天气情况。
要整合这个 API, 我们需要在 <TextInput>组件里修改回调函数以便于查询 OpenWeatherMap 的 API的信息:
_handleTextChange: function(event) {var zip = event.nativeEvent.text;fetch('http://api.openweathermap.org/data/2.5/weather?q=' + zip + '&units=imperial')this.setState({zip: zip});.then((responseJSON) => {.then((response) => response.json())console.log(responseJSON); // Take a look at the format, if you want. this.setState({forecast: { main: responseJSON.weather[0].main,.catch((error) => {description: responseJSON.weather[0].description, temp: responseJSON.main.temp } }); })}console.warn(error);});
需要注意的是我们希望返回来的数值类型是 JSON 的。 该取回数据的 API 非常简单的与之合作,这也是所有我们需要做的事。
另一个我们需要做的就是删除所有的占位数据了。 同时确保如果我们还没有取得任何数据的时候,天气预报的信息就不会被渲染。
首先,清除掉 getInitialState 里面的所有模拟数据:
getInitialState: function() { return {zip: '', forecast: null };}
接着,在 渲染器函数中,更新渲染逻辑:
var content = null;
if (this.state.forecast !== null) {
content = <Forecast main={this.state.forecast.main}
description={this.state.forecast.description} temp={this.state.forecast.temp}/>;
}
最后,在渲染器函数中使用 {content}组件代替掉原来的 <ForeCast>.
不深思则不能造于道。不深思而得者,其得易失。
名人名言- 曾国藩
- By 优联实达
- 2015-12-14
- 3401
- 公司新闻,网站开发,网站设计,UI